
Wednesday, December 2, 2009
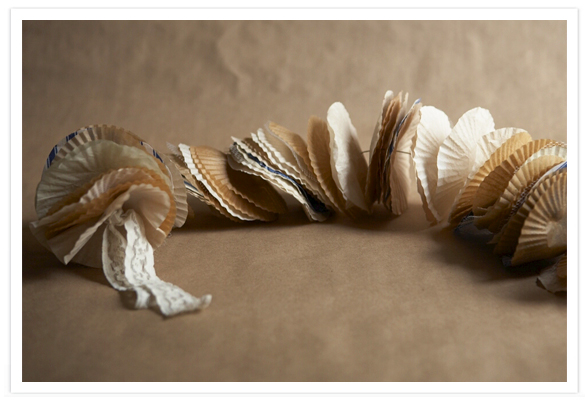
Cupcake Liner Garland
How pretty is this? I really, really like it - it would be a great way to decorate for a party. And you can use different colors of cupcake liners for different events (like red and green for Christmas).
Tuesday, December 1, 2009
Christmas Time!
I LOVE Christmas. It's definitely my favorite holiday. I've never really been into Halloween and Easter is okay, but Christmas is the bees knees.
There have been some really, really great Christmas crafts around the blogging world lately. Please allow me to share them with you? And then after you're finished with finals and before you start playing with all of your new presents you've found under your Christmas tree, work on some of these.
Make an easy tree!

Rachel, over at Hounds in the Kitchen, created this tree because she and her family were sick of their big ol' Christmas tree drying out by the time Christmas actually rolled around. What a great idea! And really, you could even have this in addition to a "real" tree.
There are TONS of Christmas ideas happening over at Sweet Paul. Well, so far, there's only two - but every day he is posting a new Christmas project. So far, we have homemade glittery Christmas cards and roasted chestnuts.


Elise at enJOY it as a great post about creating a Christmas-ey notebook/scrapbook. I love the homemade details of it. Also, I am ridiculously envious of her handwriting. My penmanship is HORRIBLE.

Craft Magazine has some GREAT projects already posted and there will only be more. So far, I am loving these ribbon cards and DIY holiday wreathes.


Finally, the Purl Bee has two projects that just...make me want to drop what I'm doing, create a huge family, and then make these monogrammed Dreidel bags and customized stockings. Kind of. Not really.
But kind of.


Stay tuned for more Christmas projects in the future!
There have been some really, really great Christmas crafts around the blogging world lately. Please allow me to share them with you? And then after you're finished with finals and before you start playing with all of your new presents you've found under your Christmas tree, work on some of these.
Make an easy tree!
Rachel, over at Hounds in the Kitchen, created this tree because she and her family were sick of their big ol' Christmas tree drying out by the time Christmas actually rolled around. What a great idea! And really, you could even have this in addition to a "real" tree.
There are TONS of Christmas ideas happening over at Sweet Paul. Well, so far, there's only two - but every day he is posting a new Christmas project. So far, we have homemade glittery Christmas cards and roasted chestnuts.
Elise at enJOY it as a great post about creating a Christmas-ey notebook/scrapbook. I love the homemade details of it. Also, I am ridiculously envious of her handwriting. My penmanship is HORRIBLE.
Craft Magazine has some GREAT projects already posted and there will only be more. So far, I am loving these ribbon cards and DIY holiday wreathes.
Finally, the Purl Bee has two projects that just...make me want to drop what I'm doing, create a huge family, and then make these monogrammed Dreidel bags and customized stockings. Kind of. Not really.
But kind of.
Stay tuned for more Christmas projects in the future!
Wednesday, November 25, 2009
Gift-Wrapping Ideas
I LOVE wrapping presents. I also love unwrapping them.
Along those lines, I LOVE buying presents for people.
...and I obviously enjoy receiving them, too.
Anyways. I feel like this year, the magazines are kicking up creative and interesting ways to wrap presents. Not that there is anything wrong with a roll of wrapping paper from Target and a little gift-tag, but come on- let's go the extra mile sometimes!
So here are some of my favorites.
First up is a slideshow from Real Simple Magazine. Click of the link in the last sentence to see all of them. Pictures are below.


Better Homes & Gardens has some great online resources, too. I especially love the following...
Glittery Snowman Gift-tag:

The following are from this page (ornaments and jingle bells!):


So get on out there and tie some stuff onto your pressies!
Along those lines, I LOVE buying presents for people.
...and I obviously enjoy receiving them, too.
Anyways. I feel like this year, the magazines are kicking up creative and interesting ways to wrap presents. Not that there is anything wrong with a roll of wrapping paper from Target and a little gift-tag, but come on- let's go the extra mile sometimes!
So here are some of my favorites.
First up is a slideshow from Real Simple Magazine. Click of the link in the last sentence to see all of them. Pictures are below.
Better Homes & Gardens has some great online resources, too. I especially love the following...
Glittery Snowman Gift-tag:
The following are from this page (ornaments and jingle bells!):
So get on out there and tie some stuff onto your pressies!
Friday, November 20, 2009
Perfect for a Winter Wedding
I believe I've mentioned this before, but I'm getting married to a wonderful, adorable boy in July of 2010. I consider myself a pretty crafty person and am trying to DIY things (invitations, save-the-dates, favors, centerpieces, etc) as much as possible.
I don't think that this would necessarily be an appropriate favor for the hot, gross, sticky, humid summer in St. Louis, but it WOULD be perfect for a winter wedding: a s'more kit.
I LOVE s'mores. They are one of those indulgences I never, ever get to actually have. The last time I had a "real" s'more (one made over a campfire) was years ago. I've tried heating it over my stove burner, which just made the marshmallow taste like gas. They explode in the microwave. You just NEED a campfire.
Or a chiminea, which we have in my backyard at home but I doubt my mom would let me use it without supervision. Nevermind the fact that I'm 21 years old or anything...
Anyway - I present to you, dear reader - the perfect winter wedding favor...

The DIY S'MORES KIT!!!
It's sleek and yummy looking and see-through. I spotted this on Twig & Thistle. You can purchase all the supplies through Packaging Supplies. They seem relatively easy to assemble - they used clear acetate boxes to package each of the three ingredients and then tied them all together with colorful baking twine. Easy-peasy!
What are some other good ideas for wedding favors? Anyone have any thoughts?
I don't think that this would necessarily be an appropriate favor for the hot, gross, sticky, humid summer in St. Louis, but it WOULD be perfect for a winter wedding: a s'more kit.
I LOVE s'mores. They are one of those indulgences I never, ever get to actually have. The last time I had a "real" s'more (one made over a campfire) was years ago. I've tried heating it over my stove burner, which just made the marshmallow taste like gas. They explode in the microwave. You just NEED a campfire.
Or a chiminea, which we have in my backyard at home but I doubt my mom would let me use it without supervision. Nevermind the fact that I'm 21 years old or anything...
Anyway - I present to you, dear reader - the perfect winter wedding favor...
The DIY S'MORES KIT!!!
It's sleek and yummy looking and see-through. I spotted this on Twig & Thistle. You can purchase all the supplies through Packaging Supplies. They seem relatively easy to assemble - they used clear acetate boxes to package each of the three ingredients and then tied them all together with colorful baking twine. Easy-peasy!
What are some other good ideas for wedding favors? Anyone have any thoughts?
Tuesday, November 10, 2009
What Crafting Essential Are You?
A quick Google search of "crafting essential" brought me to this website, with a fun little quiz.
I'm glue and sticky tape!
What are you? Tell me in the comments.
You can also find out what your secret crafting identity is here (I'm a multiple personality crafter).
[image from here]
Monday, November 9, 2009
Slide Lamp

So, this isn't really cheating, but maybe it is a little bit...
I made this slide lamp earlier this year. I've been busy lately with school work and wedding planning, and making this pillow (I need to take pictures and post them; it's coming along!!), so it's been hard to concentrate on new, specific crafts.
Making this slide lamp was a ton of fun. My high school media and history teacher, Barry O'Keeffe, had a library card catalog of old slides from his media classes in the '70s. When we graduated, he told our media class that we could take as many of the old slides as we wanted, if we needed them for anything. Most of the girls thought they were stupid, but a couple of us spent HOURS holding the little teeny slides up to the fluorescent lights, picking out ones we liked.
It was three years before I did anything with them, but when I DID - the results were pretty cool. I mean, I think the results are cool. Check it out!


I started by getting a crappy, kind of ugly lamp from Target that was way-on-sale. It was one of those lamps is rectangular shaped (as you can see in the picture above), covered/wrapped in linen. I plugged it in once, as-is, before I dismantled it. It was pretty, but I had bigger plans for it.
After ripping the fabric off of it and using Goo-Gone (oh my gosh, one of the BEST products ever, seriously) to scrape the remnants of glue off of the frame, I got to work. I measured the slides and then the length/width of the lamp and figured out that I could fit three slides across and five slides down, on each side. This meant that, with four sides, I would need 60 slides.
The main idea for the slide lamp came from ReadyMade Magazine (one of the best magazines ever). They suggested using brackets and jewelery rings to connect the slides to each other, but I tried doing that and it was too hard. I needed pliers to pull the rings apart and I got too impatient with that, SO I decided to sew the slides together.
I bought some white embroidery thread and used a thumbtack to poke holes into the cardboard part of the slides. Then I laid them side by side and sewed three slides together at a time, and then sewed the three sides onto another set of three slides, and so on and so forth. Then, I poked holes all along the top row and sides of the slides where they were congruent to frame, and I sewed those together as well.
Voila! I screwed in a lightbulb and bam! A slide lamp!
What do you think?
Monday, November 2, 2009
Anthropologie
Anthropologie is one of my favorite stores. It's a shame, though, because I really can't afford anything from it. It's super expensive, but almost every item found online or in-store is so Kaylen Hoffman it's ridiculous.
I spent a couple of minutes browsing some of the new holiday decor items this morning, and while they are incredibly beautiful, I think they can be recreated at home for much cheaper.

Snowflake ornament - this could be recreated with some wire, lots of powder-blue beads, and glitter.

Button ornament - This one is probably the easiest to recreate. I've made button ornaments before, but not quite as meticulous - this would just require a ton of red buttons, pliable wire, and pliers. I love how Christmas-ey it looks!

I LOVE this pirate ship ornament. I'm not 100% sure how to DIY it. Definitely three different kinds of fabric. Some rhinestones, wire, and some beads (if you look carefully, you can see them in the bow of the ship).

Whale Ornament - how adorable is this?! There is also a jellyfish and an anchor and an octopus. If you know how to knit or crochet, this should be easy. But I have no clue how to do either of those things. Some knitting needles, blue yarn, and polyfil (stuffing) should be all that you need.

Tree Topper - I love how old-fashioned this looks. I would need some strong, heavy wire for the base, and then another type of strong wire for the star points. Also, some beads. And then bam! An adorable tree-topper.
These next couple of things aren't necessarily holiday-related, but I love how they look handmade. And I think that they could be recreated.

Chateau Lamp - this is way too fancy, but if you're feeling especially industrious, this is definitely the project for you. You need a ton of wire and a really good pair of pliers. I guess it isn't quite as difficult as it seems, once you make a ton of the little pieces (the square windows and curliques) and then put them all together.

Travel Scrapbook - I just love how this looks. I also love VW buses. This should be relatively simple to create - just a pretty floral fabric in the background, and then six or seven different colors for the bus, flowers, and banner. Then just a little bit of embroidery to say "My Travels" and you're golden!

Teacup Lamp - this is another complicated project, but I have seen it done before on apartment therapy. You need a few pieces of tea sets - tea cups, saucers, and even a tea pot. Then, drill a small hole in the center of each piece (for the cord to the lamp to go through). Then you just need a lampshade and a lighting kit and bam! A lamp.
Subscribe to:
Posts (Atom)
